
Every cloak has a contingent cause, a formal cause, a material cause, and a final cause.
(Aristotle was wrong about a lot of things. I can't remember if he was right about this, or merely close.)
The final cause of this cloak was that my first cloak doesn't travel well. I can't allow it to be folded or even creased, in case the electroluminescent ribbon is damaged. Carrying around a five-foot garment bag sucks. And if I tried to take it on an airplane, well, that would be nonstop fun. "What are those rectangular things in your luggage with the wires and alligator clips hanging out? And batteries in the middle? And why does your garment bag have wires running down the middle?"
Since I live in North Carolina now, and have to fly to reach civilization, this is a real issue.
The formal cause of this cloak was some pottery I saw at the Festival for the Eno. It had an interesting tangent-circles pattern -- reminded me a bit of the astrological artwork in The Dark Crystal.
The contingent cause was the same as the formal cause. When I saw the pottery pattern, I thought, hmm, I've been meaning to make a new cloak. I should sketch some ideas based on this. In a bored moment at work, I did that, and I liked the result. A lot.
The material cause, as usual, was a pile of fabric and thread. Also some buttons and beads. And a sewing machine. And me.
The underlying plan would be a semicircle with a five-foot radius, the same plan I used for the Cloak of Light. That cloak came out quite short in back, so I decided to leave only four inches of neck unsewn instead of eight inches.

I wanted a lot of layers of cloth, to billow and flap around. Every piece should be attached at its top edge, not at the bottom. See? Flappier that way.
I sweated a lot about the large semicircle at the center bottom edge. It attached to the center brown crescent, the sector with large spots, and not to the bottom-most crescent with the dotted line. (If I attached it to both, the brown crescent would be effectively sewn down at the bottom.) Therefore, the attachment line of the semicircle was quite a bit narrower than the piece itself. The corners wouldn't have any reason to hang straight. However, I eventually realized that gravity pulls out in this diagram -- away from the collar-center -- and not vertically down. It's draped around me, you see. So nearly all of the semicircle would be directly below the attachment, after all.
("Crescent" is a confusion -- I shouldn't have used that term. Each of the three large pieces is a full arc, cut straight above and curved below. You only see crescents in these diagrams because the pieces overlap. Right?)
The color scheme was originally black and gold. I was visualizing astrological diagrams again, spidery gold lines on a black background. But I had more than two large regions to deal with. I brought the list up to black, gold, dark gold (whatever that was), even darker gold, red, and dark red.
No color plan survives contact with the fabric store, of course. I paced and mumbled around the racks for at least half an hour. I wanted the base (the largest arc, visible only at the bottom, but also the innermost layer) to be sturdy and warm, preferably wool. The rest of the fabrics just had to be nicely contrasting (in both color, texture, and glossiness), and also be solid colors, no patterns, and preferably none of the really glitzy plastic-fabric -- except for the gold areas, of course.
I don't ask for much.
The store didn't have any "dark gold" -- a dark bronze was what I was thinking of, I guess -- so I wound up staring at three shades of brown. One was very dark, nearly black, but the other two were nearly identical. I decided I couldn't use both. So that took care of "black" and "dark gold" (the dark brown was wool, and tough enough to be the base). What else could I find? Gold was easy. Two decent shades of red turned up. Nothing else that really fit.
Okay, rebuild the plan: forget the red collar, make that gold. Change "dark red" to red, "dark dark gold" to dark red, and I was done. Five colors, as shown above. I assembled my order: three yards of the big colors, two of the lesser ones, one of the fancy gold.
Walking from the cutting counter to the register, it struck me that three yards was nine feet, not twelve. Whoa! But too late. "The moving scissors, having slit..." Fortunately I'd left lots of margin, so I was able to rearrange my cutting plans into the smaller lengths I wound up with.
I also got a package of tiny gold-glass beads, to do the dotted lines. (The spots, I figured, would be patches of gold cloth, not beads.) And I got thread, of course. Brown, gold, and dark red. (Good sewers can hem in contrasting thread. I'm not good. Just persistent.)
I cleared off a five-by-ten patch of floor (you try it in your apartment!) and started work.
Really, persistence is all you need for this. Okay, it's a nuisance drawing circular arcs with a five-foot radius using a dull chalk-pencil and a tape measure, on a carpeted floor. (I never did get one of those cardboard fabric-laying-out surfaces. I don't think they make them five feet square, anyhow.) Even more of a nuisance drawing nine-foot-radius arcs (for that upper dark-red piece). But you do it, and it gets done, without any really hideous assymmetries.
(I doubt any part of the cloak is really symmetrical, to better than three or four percent. Some is much worse. But hey.)
I had an assembly plan at this point -- written down after the sixth time I tried to go over the whole thing in my head. Amazing how a written checklist helps steady one. Everything was in layers, you see, and they had to go on from the top down. You can't add a layer in between the two you just sewed together...
("Join" means to attach two symmetrical (same-letter) parts to each other. "Arc" and "lead" refer to the trailing (curved) edge and the leading (straight) edge of the arc pieces. You figure out the rest.)
Measure, cut, hem, measure, cut, hem, measure, cut. I didn't follow the plan exactly, but the improvisations were small. I did all the hemming first, for example.
The one major departure from plan was the large semicircle. I said earlier that the first cloak had been short in back, and I tried to correct the problem by leaving a smaller neck-gap (the top of the vertical center-seam). Well, that didn't help enough. So I redesigned the bottom piece to hang down a few inches below the base seam of the cloak.
Ignore the square corners of the semicircle -- that's just the outline of the original piece of cloth, before I cut the bottom arc. The two arcs that extend below the colored region, those are the new boundaries of the cloak.
(It occurs to me that the final shape of the red piece is one inch taller than the semicircle I cut it from. Well, I won't tell if you won't.)
(Life Imitates Art Imitating Life, Forcibly, Department: Did you know that the thread on the small spools is thicker than the thread on the large spools? Probably I was looking at the wrong spools, and some of them said "Hey! Don't put this thread in a sewing machine!" But I wound up with a bobbin full of gold thread that was quite useless for sewing. A week later, I went on my yearly pilgrimage to cornfield mazes... toting along my spool of golden thread.)
(No, I didn't actually use it. No messing up the maze for other visitors.)
Eventually I had to get on with the "bead" part. I'd already given up on the glass beads I'd bought; they were basically toroidal, and you can't sew a torus to cloth with a single stitch. It rolls around, flips up and down. No good. So I went back and bought some tiny tube-shaped gold-glass beads, instead.
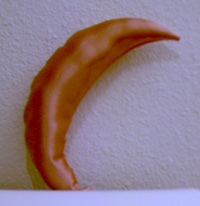
Beading turned out to be the most time-consuming task. I mean, ever. It didn't help that I'd added some complexity. I wanted crescent decorations on the small circular red pieces on the front edge. I'd hoped to make solid crescents out of the gold cloth, but the experimental crescent came out much too thick. (I eventually stuffed it full of cotton balls and donated it as a prize in the Sixth Annual IF Competition, as the "Golden Banana of Discord".)
So that left yet more beads. Well.
I settled down to a routine of take six inches of thread, stitch and tie one end, stitch back to the front, string a bead, stitch to the back, add an a extra stitch to hold, run a thumb-width along the back, stitch to the front and string a bead, et very cetera. I only did six inches at a time, because I didn't want one thread-break to lose three feet of beadwork, oy. Then when I finished an entire line, I went back through the all with a backup piece of thread. (But that one was three feet long.)
Needles aren't as thin as you think. About half the tube-beads were too narrow for the needle to fit through -- even after I switched to a smaller needle. (Before I switched, I forced the needle through a lot of almost-too-narrow beads -- only to discover, doing the backup thread, that thread isn't as thin as you think either. Oops. But I was able to force the smaller needle through those, and I avoided the almosts thereafter.)
I listened to radio plays on CD. A lot of them. Two feet of beadwork in an hour was a good pace, and you see how many feet there are? Include the large circle at the bottom. Also about two and a half feet on each small red circle.
Whew.
Really I'd sewn a hell of a lot of things already -- believe me, there's plenty of detail I've skipped -- but these were the last few. The three large arcs and the semicircle at the bottom.
(One detail: see where I said "(by hand)" above? Yeah, right. That attachment line is about four and a half feet long. Pushing that mess through the Mighty Mender was a persnickety pain, but the beading hours had run me past any desire to sew by hand.)
(The persnickety pain wasn't because I was sewing through many layers of cloth. It was only three, even counting the doubled-over hem on the semicircular edge. No, it was just feeding the whole multilayered beaded semicircle under the "arch" of the sewing machine, while the rest of the cloak tried to slide off the table on the other side of the needle.)
And then I attached the little golden circle in the center of the back, and it was done.
Oops. Forgot the gold spots. I wanted to have the cloak ready for Trinoc-Con, only a week off, and sewing little round patches of gold cloth was a terrifying thought. So I bought some inch-wide brass buttons. Presto, spots.
(I only wound up using eight buttons, not the twelve shown on the diagram. The lower four didn't seem necessary. I may add them later, I guess.)
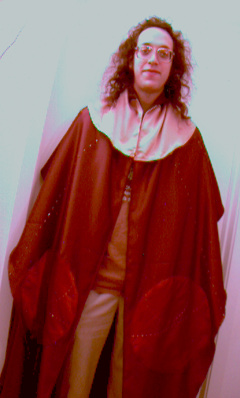
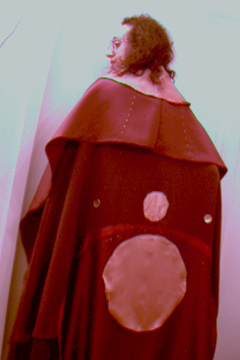
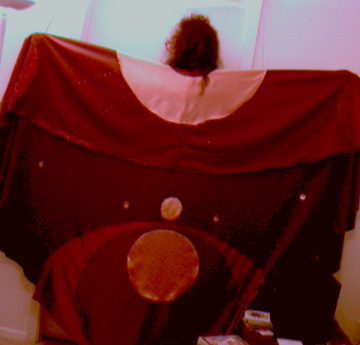
Images are links to larger images.
(You know, the more I look at these pictures, the more I realize that I shouldn't be doing image capture and editing on a laptop screen. :-) Sorry about the color balance. Yes, that goes for the diagrams too -- I eyeballed them on the same laptop.)
More pictures of me and my cloak.
Hemming curves is a nuisance. Hemming concave curves corrupts absolutely.
I've had it with the back of the cloak being too short. Next time, I'm making a cloak-pattern which is a half-ellipse, six feet semimajor by five feet semiminor. (You know how to lay out an ellipse using two pins and a piece of string, right?)
Last updated October 21, 2000.